How to Replace a Washing Machine Belt
When your washing machine starts making strange noises, refuses to spin properly, or your clothes come out soggier than they should, the culprit might be a worn-out or broken drive belt. Replacing a washing machine belt is a straightforward process that doesn’t require advanced technical skills. With a little time and the right approach, you can save money on repairs by doing it yourself. Having the proper tools for DIY repair can make the job even easier and more efficient.
What Is a Washing Machine Belt?
The washing machine belt is a thick rubber loop that connects the motor to the drum, allowing the two to work together. When the motor turns, the belt transfers that energy to the drum, making it spin during both the washing and spin cycles. Without the belt, the drum would just sit there like a motionless bucket.
A fully intact belt ensures your washing machine operates smoothly. It keeps the spin cycles consistent and powerful, so your clothes are scrubbed, rinsed, and spun dry efficiently. On the flip side, a worn or broken belt means the drum either won’t spin at all or will spin weakly, leaving you with half-washed clothes and sopping wet laundry.
Signs Your Washing Machine Belt Needs Replacing
Your washing machine may not fail abruptly it often gives subtle hints that something is amiss. A worn or failing belt is one of those issues that can sneak up on you. Catching the warning signs early can prevent more significant problems down the road. Here’s what to watch out for:
Drum Doesn’t Spin
- What to Look For: If the washing machine drum refuses to spin or struggles to move, the belt might have lost its tension.
- Why It Matters: No spinning means no effective washing, leaving your clothes unclean.
Squealing or Screeching Noises
- What to Look For: Unusual high-pitched squeals or a screeching sound during operation.
- Common Cause: This could mean the belt is slipping or is near the point of breaking.
- Why It Matters: A properly functioning washing machine should not sound like it’s in distress.
Soggy Clothes After a Cycle
- What to Look For: Wet, heavy clothes after the wash cycle concludes.
- Common Cause: If the drum doesn’t spin efficiently due to a failing belt, water won’t be fully wrung out.
- Why It Matters: Hauling waterlogged clothes around can be frustrating and time-consuming.
Visible Wear and Tear on the Belt
- What to Do: Open the rear or bottom panel of your machine to inspect the belt.
Signs to Look For:
- Cracks
- Fraying
- Stretched-out appearance
- A completely snapped belt (worst-case scenario)
- Why It Matters: A healthy belt should look solid and intact, without visible signs of damage.
Take Action Before It’s Too Late
If you notice one or more of these signs, don’t wait to address the issue. Replacing the belt promptly prevents further complications and keeps your washing machine operating smoothly. Ignoring the problem could lead to a broken machine, water leakage, or incomplete washes all of which are far more inconvenient than tackling a simple belt replacement.
Tools and Materials You’ll Need
Before you dive into fixing your washing machine, gather a few basic tools and materials. Trust me, the last thing you want is to be halfway through the job, hands covered in belt dust, only to realize you’re missing something essential.
- Flathead and Phillips screwdrivers: These are your go-to tools for removing panels and screws. They’re cheap and likely sitting in your junk drawer, crying out for a purpose.
- Socket wrench or spanner: Depending on your washing machine, you might need one of these to loosen bolts holding the panel in place. If you’re not sure which, have both on standby.
- Replacement washing machine belt: This is the MVP of the operation. Match the belt to your washing machine’s model number guessing won’t cut it. Nothing derails a project faster than the wrong part.
- Towel or cloth: Things will get dusty, and maybe even wet. A towel not only protects your floor but also keeps cleanup from becoming a second, unplanned job.
- Safety gloves (optional): Not strictly necessary, but useful if you’re working in tight spaces or dealing with sharp edges. Scraped knuckles are overrated, anyway.
Lay these all out before you start. Having what you need within arm’s reach means less stress and no emergency trips to the hardware store mid-project. It’s a small step that guarantees the job stays as straightforward as it should be.
Step-by-Step Guide to Replace a Washing Machine Belt
Replacing a washing machine belt can seem daunting, but with the right tools and guidance, it’s absolutely doable. Follow this step-by-step guide to get your washing machine functioning like new again.
1. Prepare for the Task
Before diving into the replacement, ensure you’ve taken the proper safety precautions and prepped your workspace.
- Unplug the machine. Always disconnect the washing machine from the power supply don’t just turn it off.
- Turn off the water supply. If your machine connects to a water source, shut off the water valves to avoid leaks.
- Create a workspace. Move the machine away from the wall to give yourself enough room to work. Use a towel or cloth under the machine to protect your flooring. If the machine feels too heavy to move alone, ask for help.
2. Access the Washing Machine Belt
Finding the belt is your next task, and its location will vary depending on your machine’s model.
- Locate the belt. It could be behind a back panel or underneath the machine. Consult your machine’s manual for specifics.
- Remove the panel. Use a screwdriver or wrench to remove the screws on the back panel. If the belt is located underneath, tilt the machine carefully (ask someone to help hold it steady). A flashlight will make spotting tricky areas easier.
3. Inspect the Old Belt
Before pulling the belt off, examine it to confirm it’s the problem.
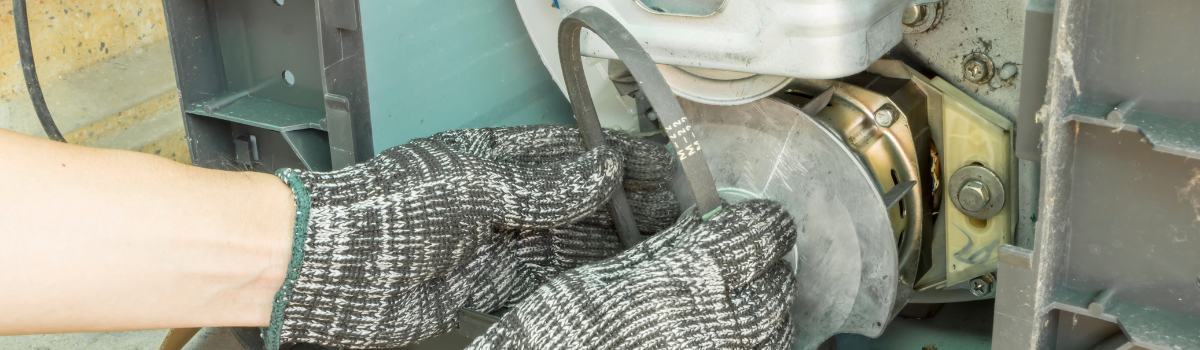
- Spot the belt. Look for a rubber loop connecting the drum pulley (a large wheel) to the motor spindle.
- Check for damage. Look for cracks, frays, or breaks. If the belt appears intact, the issue might lie elsewhere, and you may need professional assistance.
4. Remove the Old Belt
If the belt is damaged, it’s time to take it off.
- Remove the belt. Rotate the drum by hand while sliding the belt off the pulleys. It may feel tight, which is normal.
- Document the setup. Snap a photo or note how the belt is positioned for reference when installing the new one.
5. Install the New Belt
Now that the old belt is out of the way, you’re ready to put on the replacement belt.
- Position the belt. Start by aligning it with the grooves on the drum pulley.
- Stretch and fit. Stretch the belt over the motor spindle. Rotate the drum by hand to help guide the belt into place.
- Check alignment. The belt should sit firmly without slack or wobbling. Test by spinning the drum to ensure smooth movement.
6. Reassemble the Washing Machine
You’re almost done! Reassemble the machine and prepare for testing.
- Replace the panel. Screw the back panel (or bottom cover) securely back into place, being careful not to overtighten.
- Reposition the machine. Push the washing machine back to its original spot, reconnecting water lines and hoses as necessary.
7. Test the Washing Machine
Finalize your work by confirming that everything is functioning properly.
- Power it up. Plug the machine back in and start a short cycle.
- Listen and watch. Check for unusual noises, such as grinding or squealing, and ensure the drum rotates smoothly during the spin cycle.
- Celebrate your success. If everything works as expected, you’ve successfully replaced the belt and saved yourself a repair bill!
By following these simple steps, you can tackle this DIY repair with confidence.
Tips for Success
- Know your machine: Before you even think about buying a replacement belt, locate your washing machine’s model number. It’s often hiding on the inside edge of the door or on a sticker at the back. Guessing won’t cut it belts come in specific sizes that need to match your machine.
- Snap some pics: When taking things apart, grab your phone and snap a few reference photos at each step. It’s a lifesaver when you’re scratching your head later, wondering if that wire or panel goes left, right, or somewhere in between.
- Keep your screws in check: Tiny screws have an annoying habit of disappearing into the abyss. Use a small bowl or magnetized tray to keep them all in one place. You don’t want to waste an hour hunting for a rogue screw while your washing machine sits half-disassembled.
- Don’t rush it: Washing machine panels can be surprisingly stubborn. If something doesn’t budge, double-check for hidden screws or clips. Forcing it might save you a second, but cracking the panel will cost you way more.
- Rotation test is king: After installing the new belt, spin the drum by hand a couple of times. If it feels smooth and the belt isn’t wobbling around like a bad karaoke singer, you’re good to move to the reassembly stage.
- Sweat the small stuff: Worn pulleys or loose motor mounts can make even a new belt fail faster. While you’re in there, give everything a quick inspection for signs of wear or misalignment. A few extra minutes can save you a second repair job later.
Confidence can take you far, but a little caution goes even further. Take your time, stay organized, and your washing machine will be back in action in no time.
Conclusion: How to Replace a Washing Machine Belt
Replacing a washing machine belt is a surprisingly simple repair that can save you both time and money. With the right approach and a little patience, you can handle this common issue without calling a repair technician.
Why It’s Worth Doing Yourself
- Saves Money: Avoid costly service fees by tackling the repair on your own.
- Quick Fix: With proper guidance, the task can be completed in under an hour.
- Builds Confidence: Completing the repair yourself can be incredibly satisfying.
What You’ll Need
Before getting started, make sure you have:
- A set of basic tools (e.g., screwdriver, wrench)
- A replacement washing machine belt
- A clear workspace to maneuver
Key Takeaways
- Approach the repair step by step. Don’t let the process intimidate you it’s manageable with the right mindset.
- Once you’ve replaced the belt, your washing machine will run like new, eliminating those soggy laundry days.
So, clear some space, gather your tools, and take on the project your washing machine (and your wallet) will thank you!
Related service
Need a technician?
We handle appliance repair across Metro Vancouver and the Lower Mainland. Same-day service usually available.